Using a Snapshot Standby Database to test a Characterset Conversion with DMU
Converting a database to a Unicode characterset can be a time consuming work. The Oracle Database Migration Tool for Unicode (DMU) does a really good job. But I cannot predict the duration of such a conversion. And of course, the users want to know the duration of the downtime for the conversion. In this case, a Snapshot Standby Database can help for testing.
If you have a DataGuard Physical Standby Database in place, you could use this database for testing DMU. But of course, this will impact your failover capabilities, because primary and standby database will be out of sync for the time of the conversion and there is no easy and immediate failover possible. If this is a concern for you, I recommend to add an additional standby database for these tests.
What’s the plan:
- Setup a DataGuard setup with a physical standby database (not covered in this blog post)
- Prepare the database for DMU
- Convert the standby database to a snapshot standby database
- Run a trial conversion of the standby database to Unicode with DMU (details are not covered in this post)
- Convert the standby database back to a physical standby database
Let’s see how it works ..
Lab Setup
- “Hardware”: 2 virtual machines, named riemann and ramanujan
- Oracle Version: 11.2.0.4 Enterprise Edition:
- DataGuard Setup:
DGMGRL> show configuration

Configuration - DGDB

  Protection Mode: MaxAvailability
  Databases:
    dgdb_s1 - Primary database
    dgdb_s2 - Physical standby database

Fast-Start Failover: DISABLED
Step 1: Prepare the database for DMU
DMU needs an additional package so we have to install it in the primary database (as SYS)
SQL> @?/rdbms/admin/prvtdumi.plbStep 2: Create database connections in DMU
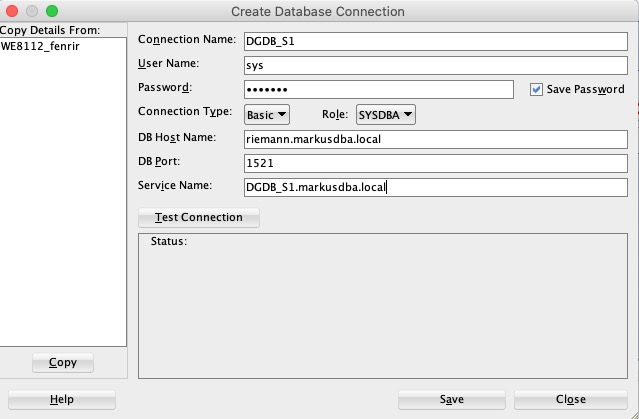
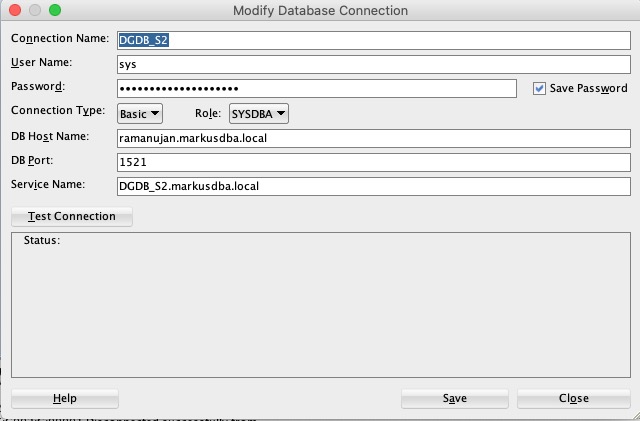
Assuming that you have downloaded, unzipped and started DMU, please add two database connections in DMU (one to the primary database and another one to the standby database). Please note that DMU requires connections as “SYS”.
Connection to primary database:

Connection to the standby database:

Step 3: connect to the primary database and create the repository for DMU
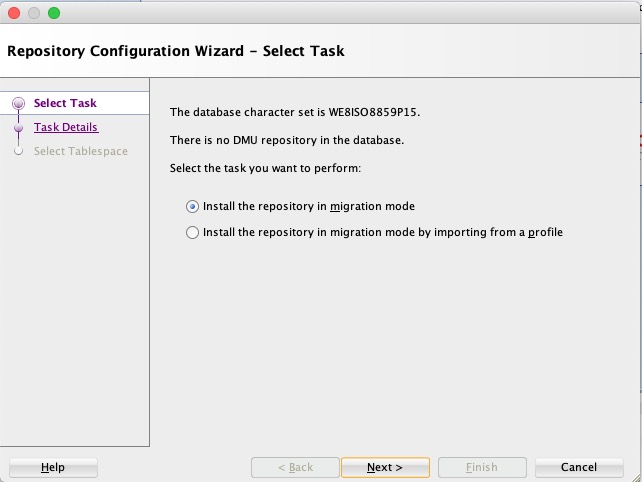
As soon as you create to the primary database, DMU will detect that there is no repository and needs to create a repository:

in my simple test case, I create the repository in the SYSAUX tablespace, but for larger databases I recommend that you create a dedicated tablespace for the repository.
Of course, you could create the repository later on in the standby database after you have converted it to a snapshot standby database, but I recommend to do it on the primary database.
Step 4: Decide where to do the scan and where to perform the required corrections
Part of the conversion is a full scan of the database (which columns have to be converted, are there any issues (invalid representation, type limits exceeded etc.) and perhaps some corrective actions have to be performed. You have to decide, when and where to perform these steps:
Option 1: Run scan and corrections in the primary database before converting the standby to a snapshot standby
Option 2: Run the actions in the snapshot standby database
In my opinion, the advantages of option 1 are
- The corrections have to be done only once, DataGuard will propagate them to the standby site.
- In addition to that, the results of the scan, which are stored in the DMU repository, will be propagated to the standby site, too.
- The time when primary and standby are “out of sync” will be shorter, because some operations have already been executed on the primary beforehand
On the other hand, the disadvantage is that this will cause additonal load on the primary site and you will have to re-run these steps on the primary site when you start the conversion of the primary database.
In my case, I will do all these operations on the standby site, so the next step is:
Step 5: Convert the Standby Database to a Snapshot Standby Database
Make sure that the recovery area is defined on the standby database and large enough:
SQL> show parameter db_reco

NAME				     TYPE	 VALUE
------------------------------------ ----------- ------------------------------
db_recovery_file_dest		     string	 /u02/fast_recovery_area
db_recovery_file_dest_size	     big integer 4977M
Convert the standby database to a snapshot standby database:
SQL> alter database recover managed standby database cancel;
Database altered.

SQL> alter database flashback on;
Database altered.

SQL> alter database convert to snapshot standby;
Database altered.
Open the standby database in upgrade mode:
SQL>  alter database open upgrade;
Database altered.
If you are running on RAC you have to be in single instance mode for opening the database in Upgrade mode, so you have to prepare a parameter file with “CLUSTER_DATABASE=FALSE” and use this file when opening the database.
If you do not open the database in upgrade mode, Oracle will start the application services and users may happen to connect to the database. This would impact the conversion.
Step 6: Scan and Convert the Snapshot Standby Database using DMU
Connect to the standby database in DMU and perform the required actions:
- scan the database
- perform all required corrective actions (and keep track of them so that you can re-run them on the primary site)
- convert the database
I will not cover the details in this blog post, please see the DMU documentation for more information.
The main information you will get from this step is:
- How long do all these operations (scan and conversion) take?
- Which are the corrective actions which have to be taken?
Step 7: Convert the standby database back to a physical standby database
oracle@ramanujan:/u02/fast_recovery_area/DGDB/ [DGDB] sqlplus / as sysdba

SQL*Plus: Release 11.2.0.4.0 Production on Fri Jul 31 19:12:03 2020
Copyright (c) 1982, 2013, Oracle.  All rights reserved.

Connected to:
Oracle Database 11g Enterprise Edition Release 11.2.0.4.0 - 64bit Production
With the Partitioning, OLAP, Data Mining and Real Application Testing options

SQL> shutdown immediate;
Database closed.
Database dismounted.
ORACLE instance shut down.
SQL> startup mount;
ORACLE instance started.

Total System Global Area 3674501120 bytes
Fixed Size		    2258640 bytes
Variable Size		  788531504 bytes
Database Buffers	 2868903936 bytes
Redo Buffers		   14807040 bytes
Database mounted.

SQL> alter database convert to physical standby;
Database altered.

SQL>  shutdown immediate;
ORA-01507: database not mounted
ORACLE instance shut down.

SQL> startup nomount;
ORACLE instance started.

Total System Global Area 3674501120 bytes
Fixed Size		    2258640 bytes
Variable Size		  788531504 bytes
Database Buffers	 2868903936 bytes
Redo Buffers		   14807040 bytes

SQL> alter database mount standby database;
Database altered.

SQL> alter database recover managed standby database using current logfile disconnect;
Database altered.

SQL> exit
Disconnected from Oracle Database 11g Enterprise Edition Release 11.2.0.4.0 - 64bit Production
With the Partitioning, OLAP, Data Mining and Real Application Testing options
Step 8: Check the status of your DataGuard
DataGuard will start its work on the standby database and will apply all the transactions from the primary site.
After some time – depending on the duration of the conversion and the amount of transactions on the primary site, both databases will be in sync again:
oracle@ramanujan:/u02/fast_recovery_area/DGDB/ [DGDB] dgh
DGMGRL for Linux: Version 11.2.0.4.0 - 64bit Production

Copyright (c) 2000, 2009, Oracle. All rights reserved.

Welcome to DGMGRL, type "help" for information.
DGMGRL> connect sys
Password:
Connected.
DGMGRL> show configuration

Configuration - DGDB

  Protection Mode: MaxAvailability
  Databases:
    dgdb_s1 - Primary database
    dgdb_s2 - Physical standby database

Fast-Start Failover: DISABLED

Configuration Status:
SUCCESS

DGMGRL> show database verbose dgdb_s2;

Database - dgdb_s2

  Role:            PHYSICAL STANDBY
  Intended State:  APPLY-ON
  Transport Lag:   0 seconds (computed 0 seconds ago)
  Apply Lag:       0 seconds (computed 0 seconds ago)
  Apply Rate:      17.76 MByte/s
  Real Time Query: OFF
  Instance(s):
    DGDB
[...]

Database Status:
SUCCESS

DGMGRL> exit
Links & References
Amazon-Partner-Link: